Saturday 30 October 2010
Childhood influences...
A trip back home at the end of the week had me looking through some of my old childhood books. I just love the illustrations, here are a few badly lit photos that I took.
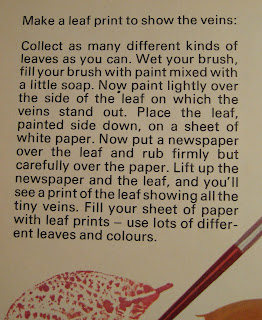
I've been obsessively collecting some gorgeous Autumn leaves over the last few weeks, so I was really pleased to find this page on printing with leaves following on from the fun of printing with apples.
Here are the instructions incase you are interested...
I also found some telegrams from my parents wedding, aren't they beautiful? It's a shame they don't do them anymore. Loving the boy-band bell ringers and the doves.
The final book was entitled 'Travelling by Land' and I won it at school for 'Endeavour in Lower Kindergarten'. Makes it sound a little like I had to climb a mountain every day to get to school. I didn't, Poole is quite flat, but it's good to see I was a girly swot right from the outset. I love this book, it reminds me of the 'This is...' series in particular This is London.
And I saved the best for last. Finally I understand where my strongly held beliefs about my place on this planet come from, it was here in this book that the seed was sewn, right back in Lower Kindergarten. Children go to school, fathers go to work, and mothers ...
Labels:
books,
illustration,
vintage
Wednesday 27 October 2010
A is for apple
It's half term, it's raining, it's time to craft. Martha Stewart style. There is so much to do with kids on the Martha Stewart website, and grown ups too. Check out this felty goodness and these amazing Halloween decorations and cakes. Ok - the site is a little slow and heavy to navigate, groaning as it is under the weight of all the advertising, but there is so much cool free stuff, it's worth it.
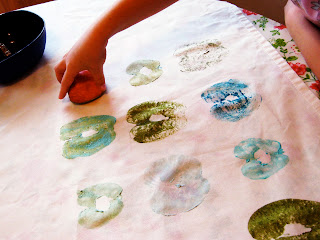
I've have a load of gorgeous fabric paints for ages and they are all in shades of green with different finishes, glitter, pearl, gloss and apparently some flock when you iron them.
It's the first time we've used them and I like the effect of all the different shades together. Some of the paints were a little watery, mostly the glitter ones, you could get a lovely sharp stamp with a more solid colour. Because of this, it worked out better to paint it onto the apple rather than dip it, which didn't give a very good coverage.
We had a variety of different sized apples and different pots and brushes for each colour. Though by the end my daughter enjoyed mixing them all up.
It was great fun for both of us, I have been flicking through Lena Corwin's
Labels:
apples,
craft,
kids,
Martha Stewart,
printing
Tuesday 26 October 2010
Ardingly antiques fair
Today I braved the freezing weather to go to my first Antiques and Collectors fair at Ardingly show ground. I've never been to anything like this before so I wasn't really sure what to expect, but to sum it up briefly it was immense, random and cold.
Theses fairs happen all over the country and there seems to be one at Ardingly every couple of months. If you love stuff, GO. There was so much of it; furniture, silverwear, ceramics, more silverware, jewellery, all manner of different stuffed animals. Everything you could ever want, it was there.
I wasn't looking for anything in particular, it was really nice just to walk around (well apart from the fact it was bitterly cold - I imagine it would be much better in the spring). It was an amazing place to take photos, there were so many weird and wonderful things to photograph, but I did feel a little inhibited taking them of peoples stalls mostly because no one else was. As a result I did miss some great photos, next time I will be more bold, or perhaps sneaky.
Most of the fair is outside, but at Ardingly there is also a lot inside, and this was mainly the smaller stuff which I didn't find as interesting as the bigger random bits outside. But there were some lovely things to be found.
I was hoping to find some lovely vintage fabric, but there wasn't a great deal of textiles. I did find a few stalls selling old bits of lace and old clothes and scarves that had potential. There was one lovely stand with some dress patterns, loving the illustration on these.
Also, if you live in a flat and need some pointers on how to survive, it may be worth trying to find this book...
There was some beautiful hardware to be found, great if you were trying to refurbish a Victorian house, these door handles looked so pretty all lined up...
One little stall had a tonne of sewing notions and equipment,
Random seller award to this guy, old school footballs, wooden skis and a toy car. All it's missing is a stuffed badger, but not to worry, there were plenty of those elsewhere, along with stuffed squirrels, ferrets, deer, birds, foxes, next time I go, I will played stuff animal bingo, want to play too?
In the end I bought nothing, the only thing I came close to buying was a french book of kids clothes from the 20's/30's which would have made an amazing source book but it was incredibly expensive.
Exciting other random occurrences from the day, my friend and I turned a corner to see money everywhere fluttering all over the path. People were picking it up and naturally we pitched in too. Most of the crowd dispersed quickly leaving us with the money we collected and that of an old lady who was keen to hand it over. We handed it in of course, much to the horror of the stewards who we asked for help. We found £250, I think at least double that was blowing around.
Also, we saw actual Cath Kidston, carrying around some pretty textiles for inspiration, of course, what else would she be doing? stuffed animal bingo maybe, I expect she has been before.
Labels:
Ardingly antiques fair,
IACF
Monday 18 October 2010
Quilts at Anthropologie
It's been a while since I dedicated a post to Anthropologie, too long I think. So here are some pictures of pretty quilts from their bedding collection to drool over.
I am way to conservative when it comes to colour in my house, so these amazing quilts would look totally out of place, but I can admire them none the less.
Loving the mix of grey and yellow in this one...
Labels:
Anthropologie,
patchwork,
quilts
Sunday 17 October 2010
M is for make a sewing machine cover
Following my tutorial on how to make a bedside tidy, next up is how to make a sewing machine cover. My sewing machine always seems to be kicking around somewhere in the house as it's not the prettiest thing to look at, the time has come to make it a coat and dress it up a bit. Here is how to do it...
1. Measure your sewing machine, the height, depth and width, taking into account all the bits that stick out from the sides. Using these measurements, make a pattern out of newspaper; 4 sides and a top.
2. If you have a handle on the top and want to make a hole so that you can pick it up with the cover on, follow these steps, if not, skip these bits. Mark on the top panel the size of the hole you will need and cut it out.
3. Put it back on the top and see if it is the right size, if not use masking tape (as I did) or stick on extra paper to adjust the size.
4. Once you are happy the hole is the right size, tape the sides to the top panel and place it over your machine, it's easier to leave the sides unstuck so that you can adjust the size if you need to. Make it a bit smaller/bigger shorter/longer as required.
5. Choose your fabric; do you want an all over print, a plain fabric with a pretty border, or plain all over with some applique to personalise it. I chose from these gorgeous Kokka prints. In the end I went for the smaller apple print on the left as it is a slightly heavier weight linen/cotton blend so felt better suited to a cover. The Echino or Kiyohara fabrics would also be ideal.
7. Mark out the hole in your top panel onto the reverse side of the fabric using a washable marker. At this stage I strongly recommend placing the piece onto your sewing maching to make sure you have the hole in the right place as this is the last chance to change it.
8. Draw on a 2cm allowance all the way round outside of the hole, mark out the bit you need to cut out in the middle and then cut it out. You may wish to add some iron on interfacing to make the top panel a little stiffer. If so, use the pattern piece and make the hole 2cm bigger all the way round so that you don't have to sew through the interfacing too when finishing the edges of the hole.
10. Next sew as close to the fold as possible all the way around the outside, when you get to the corners, make sure you capture the diagonal of the fold (below). Also sew around the inside of the seam, again as close the the fold as possible, this will make it stronger. When finished, give it a good iron.
11. Matching the wrong sides together, sew together all the side panels so that you make a tube. Stop 1cm from the top at each seam. Make sure you include all 4 pieces and not do what I did, which was sew 3 together and wonder what the remaining piece was left on the table. Press open the seam allowances.
12. Cut out a 1cm x 1cm square out of the seam allowance (which is drawn on below) at each corner on the top panel, like this...
13. Pin the 'tube' to the top panel wrong sides together. Take care to pin it accurately, matching the corners together. Then sew each side separately, making sure that you go backwards and forwards at each corner to finish them off properly. It should look like this;
14. Press open the seams as far as possible, turn inside out and poke out the corners. Place your cover over your machine and reassess how high the hem should be. My cover ended up a lot more generous than I expected, so I had more hem to turn up, also I wanted it to be clear of the bottom of the machine so had about a 1cm gap between my table and the bottom of the cover.
15. Whatever your resulting hem is, half the distance, fold the fabric onto the wrong side, iron it, fold it over the same distance again and iron again. Sew on the wrong side so that you catch the hem, and sew as close to the fold as you can. This fabric doesn't fray too badly, but I used my pinking shears on all the seam allowances as a precaution.
16. Give it one final iron and you are all done!
Labels:
how to make,
M is for made,
sewing machine cover,
tutorial
Subscribe to:
Posts (Atom)


